How Are Your Fingerprint Keepsakes Made?
I work from photos of fingerprints in order to make your special fingerprint keepsakes. I don’t care what method you use to capture your fingerprints as long as you are able to provide me with clear, in-focus photos of fingerprints where individual fingerprint lines are visible. You don’t need to have the fingerprints made and photos on hand when you place your order. Simply email them to me any time after you order. It is important to understand, the quality of the fingerprint on the jewelry depends on the quality of the fingerprint photo you send. However, if you don’t have a good quality fingerprint and you can no longer create one, many times I am able to enhance and edit the fingerprint you do have.
These are the types of fingerprint images I can use:
- Fingerprints made using pencil (preferred method)

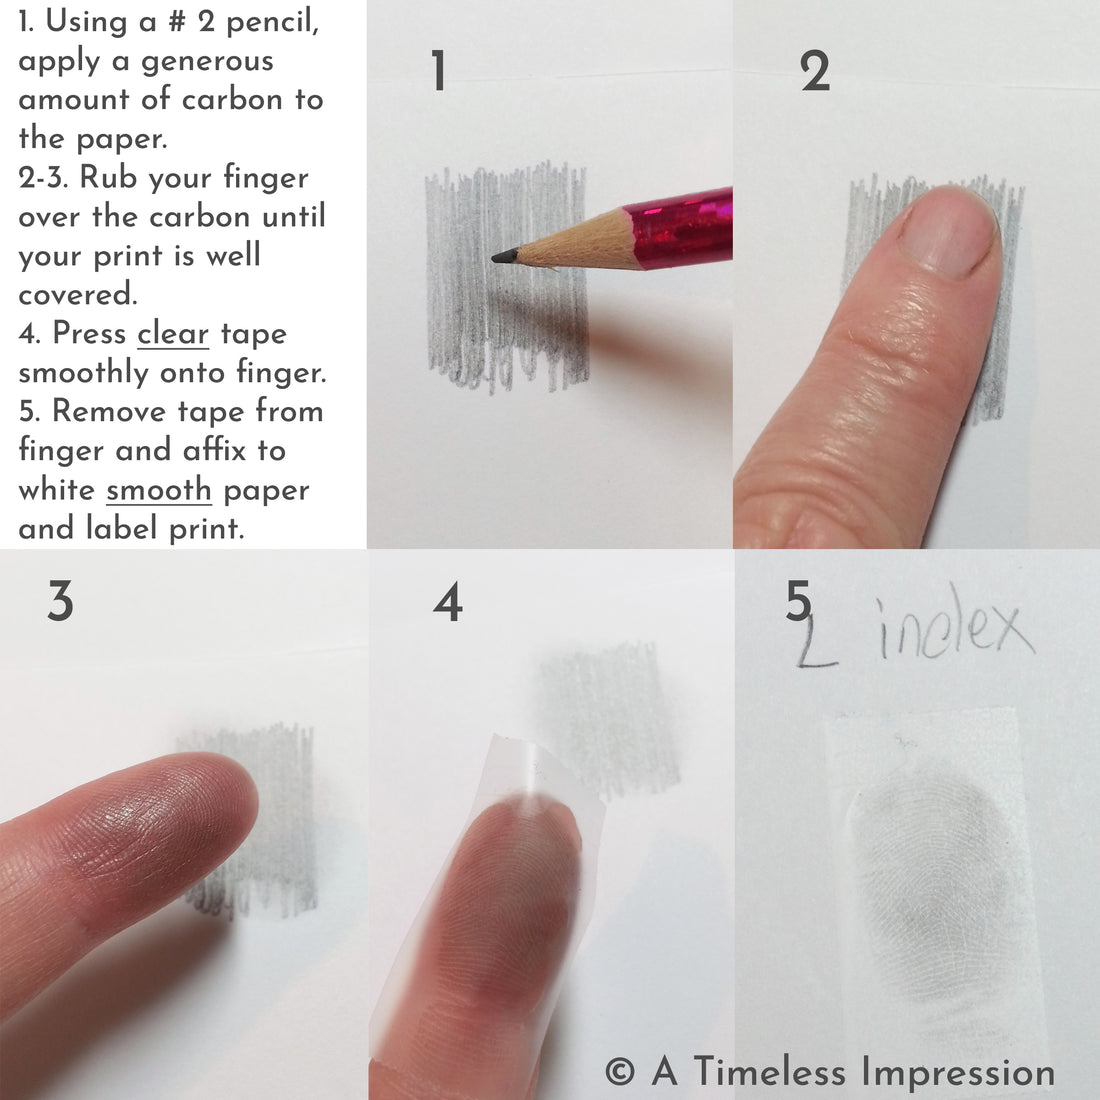
- Using a No 2 or HB lead pencil, color an area on white paper approximately 1 to 1.5 inches. I recommend going over the area numerous different directions so you get really good coverage.
- Rub your finger over the carbon until it is well covered. Look for the part of your fingerprint that shows the most detail and focus specifically on getting good coverage on that area. This is just just above the first knuckle.
- Press clear tape smoothly onto your finger covering all of the leaded area. While I can usually work with satin tape, the print lines are more detailed and clear with CLEAR tape.
- Remove the tape from your finger and place on a white sheet of paper. Please use smooth white paper as textured paper can alter the fingerprint lines and make it difficult to extract just the fingerprint lines from the image. Please write the initials (or Mom or Dad or other identifier) next to each fingerprint if sending fingerprints for multiple people.
- Take multiple prints of multiple fingers. The more prints I have to work from, the better opportunity we will have for a good outcome.
- Using your smartphone, take well focused photos of your fingerprints. Be sure you are in good lighting and be sure there are no shadows over the fingerprint. Close up photos are good, but it is more important to be well focused than super close. Sometimes propping your hand on an object while taking the photo will help to keep the camera from moving when pressing the button. If you can't get well focused photos, you can always send the original photos to me via snail mail. I can sometimes use scanned images, but photos tend to work better.
- Fingerprints made using ink
- Fingerprints produced from a fingerprint scanner (as many funeral homes use)
- Photos of actual fingers, as long as the photo is extremely well focused and there are no reflections. These are examples of good (left) and bad (right) images:


- These are the types of image files I can use: jpg - png - pdf
- These types of fingerprint images do not work: bmp files - fingerprints scanned on a copier/scanner
Fun Facts
- Fingerprints form during the fetal stage of development.
- A fingerprint is an individual characteristic. No two people have been found with the exact same pattern.
- A fingerprint pattern will remain unchanged for the life of the individual; however, the print itself may change due to permanent scars and skin diseases.
- There are 3 specific classes of fingerprints: Arch, Loop and Whorl. 60% of people have loops, 35% have whorls and 5% have arches.
Now that you have the details on how to get the best fingerprint, head on over to the Everlasting Prints Collection to start looking for your perfect fingerprint keepsake.